Author name: Heidi Taylor

Covering South Cumbria, Heidi Taylor is your local specialist for tile cleaning, stone cleaning, grout cleaning and tile, stone and grout sealing covering the restoration of all types of stone and tiled flooring including Ceramic, Limestone, Marble, Porcelain, Quarry, Sandstone, Slate, Terracotta, Terrazzo, Travertine and Victorian tile

Aldous Red Sandstone Floor Restored Greystoke

Aldous Red Sandstone Floor Milled Back to Health in Greystoke

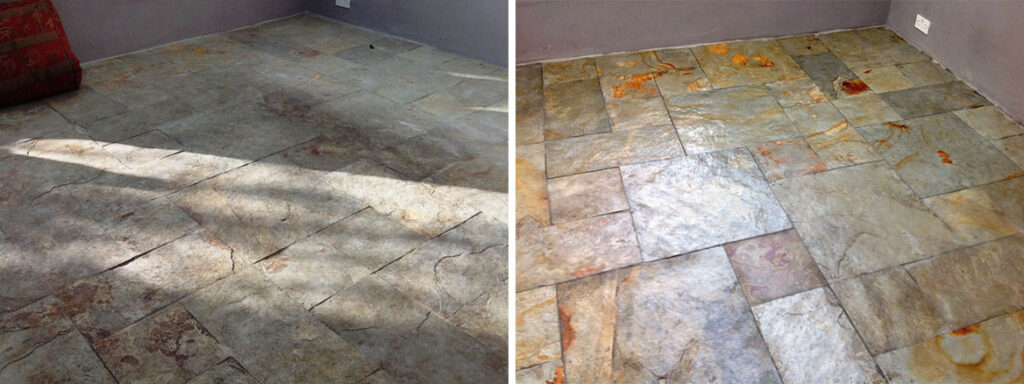
The customer at this 200-year-old property near Greystoke asked if we could do anything for their old Stone floor as a new Kitchen was to be fitted and a decision had to be made to either rip up the old floor or have it restored.

Aldous Red Sandstone Floor Before Renovation Greystoke

The stone was Aldous Red Sandstone which if you have read our website is something we are quite familiar with. One thing we have learned from restoring these floors over the years is that they are very forgiving and the best way to renovate them is to grind off the old and often badly stained surface. We call this process Milling and it involves applying different grades of coarse diamond pads, the result is a fresh new surface that smoother and much easier to maintain. We can also re-point the mortar which is often past its best on these old stone floors.

Having discussed my recommendation, they agreed to go ahead, and we set a date in the diary for the work to start.

Milling Aldous Red Sandstone

Milling involves the application of several coarse grades of hard diamond pads to the stone using water to lubricate the process, the water also helps make the removal of the soil easier and reduces dust. I followed our usual method of starting with a very coarse 50-grit pad and then moved up to 100 and then 200-grit milling pads rinsing and extracting the soiling in-between each pad with a wet vacuum. These 17-inch pads fit a rotary floor buffer that has weight added to ensure maximum traction between the pad and the stone floor.

Once done the next step was to rake out the loose mortar between the slabs, cleanup the area and then repoint with a breathable pointing mix in Light Grey. That was left to set and the floor was given a light clean with Tile Doctor Pro-Clean to remove any dust and get it ready for sealing.

Sealing a Red Sandstone Tiled Floor

We returned the following day and checked the floor was dry using the moisture meter, we don’t recommend applying a sealer to a damp floor as the sealer will not cure properly. All was well, so we then applied Tile Doctor X-Tra Seal which is an oil based Breathable Colour enhancing sealer.

Using a breathable sealer on old stone floors like this is highly recommend as these floors rarely have a damp proof membrane installed and so it’s important to give moisture a way of rising through the floor naturally and evaporating rather than being trapped under the floor where it can eventually build up in the walls.

You can see from the photos that the work was transformational and have added new life to a 200-year-old floor which I’m sure will look even more stunning once the new kitchen has been fitted.

Aldous Red Sandstone Floor After Renovation Greystoke

For aftercare cleaning of a sealed floor, we recommend the use of Tile Doctor Neutral Tile Cleaner, it’s a mild but effective cleaning product that won’t impact the sealer.


Professional Restoration of an Aldous Red Sandstone Paved Floor in North Cumbria

Aldous Red Sandstone Floor Milled Back to Health in Greystoke Read More »

Flood Damaged Red Sandstone Hallway Renovation Penrith

Flood Damaged Red Sandstone Hallway Floor Renovated in Penrith

The customer from Penrith called us in to see if we could improve the appearance of their Red Sandstone hallway floor. Several weeks earlier it had been covered in mud and water from flooding. Once the flood waters had subsided the floor was given a general clean, but the stone looked terrible and completely washed out.

Flood Damaged Red Sandstone Hallway before Cleaning Penrith

Its important to let everything dry out before attempting any renovation work and this is especially the case with Stone and Clay tiles. When the floors this bad there’s no point trying to get a decent clean just by using chemicals alone, so we often offer a system we have perfected at Tile Doctor called “Milling”. We discussed the project in detail with the client and agreed a price and a time to complete the work.

Flood Damaged Red Sandstone Hallway before Cleaning Penrith Flood Damaged Red Sandstone Hallway before Cleaning Penrith

Restoring Flood Damaged Red Sandstone

Milling pads are encrusted with very coarse industrial diamonds and allow you to cut deeper into the stone than the burnishing pads we use for polishing. We use them to remove a thin layer of stone from the floor to reveal new stone underneath.

Tile Doctor supply these pads in different sizes, types and grits and on this occasion, we used a 17 inch 200-grit milling pad fitted to a Numatic buffing machine running on low speed. Extra weight was added to the machine to improve the depth of clean and the process was lubricated with a strong dilution of Tile Doctor Remove and Go. The edges were then cleaned with a set of handheld Diamond Blocks which allow you to get right into the corners. Once the whole floor had been treated it was rinsed with water and the soiling extracted with a wet vacuum.

The Sandstone floor was then given an acid rinse using Tile Doctor Grout Clean-up to remove stone resins and neutralise alkaline salts which can build up in the stone and present themselves as White Efflorescence later. The floor was then given a final rinse and dried as much as possible with the wet vacuum before allowing it to dry off overnight.

Sealing Red Sandstone Flooring

The stone floor was left to dry out for a full 24 hours and we called back on the 3rd day to apply a coat of Tile Doctor X-Tra Seal, which is an oil-based sealer that improves colour and structure to the stone. This product is fully breathable and rated for external use and so will cope with any further dampness coming up from the ground.

The sealer really brought out the true red colour of the Sandstone and completely transformed its appearance. The customer has only lived in the house a short time and had no idea of what colour the stone should be as it was Grey when they moved in.

Re-Pointing Red Sandstone Flooring

It was quite rewarding to bring the stone back to life and to finish the renovation of the floor our attention turned to the pointing which had been compromised by the flooring and was in a bad state.

The old pointing was carefully knocked out and after cleaning up the floor was re-pointed using a modern breathable pointing product called VDW 800 which comes in four different colours, it’s very easy to apply, copes well with wide gaps and fully hardens in 48 hours.

Traditionally a Lime mortar was used for this but there are several draw backs with this as it never really sets, and if you mop or clean the floor then traces of White pointing stain the stone. This is very noticeable on darker stones and secondly, it’s difficult to work with and remove after it has dried.

Flood Damaged Red Sandstone Hallway after Renovation Penrith Flood Damaged Red Sandstone Hallway after Renovation Penrith


All in all, the Sandstone floor responded very well to our restoration methods and sealer, needless to say the customer was very happy with the result. For aftercare cleaning of Sandstone flooring I recommend the use of Neutral Tile Cleaner which is gentle enough not to impact the sealer yet an effective floor cleaning product that can be used regularly.

Flood Damaged Red Sandstone Hallway after Renovation Penrith


Professional Restoration of a Red Sandstone Hallway Floor in North Cumbria

Flood Damaged Red Sandstone Hallway Floor Renovated in Penrith Read More »

Black Slate Floor Renovation Glenridding Ullswater

Black Slate Floor Renovated in Glenridding Ullswater

I thought I would share the details of this Black Slate floor renovation we recently completed in Glenridding in Ullswater. Slate is a popular choice for flooring in the Lake District due to its abundance in the area so I’m sure it will be relief to some to know that it can be restored regardless of the state it gets into.

Black Slate Floor Before Renovation Ullswater Black Slate Floor Before Renovation Ullswater

This House was actually an old Miners Cottage based in the Valley of Glenridding and the Black Slate was actually from the mine itself. After nearly two hundred years of use the old floor was still in good structural condition although the pointing had perished in many areas and needed replacing

Unless it’s being completely removed, I always recommend putting old floors like this back into use. Reason being the lack of a damp proof membrane which if in place would prevent moisture rising through the floor; old floors like these don’t have a DPM so its best to maintain them and let them breathe so moisture can evaporate at the surface. Cover them up and you risk damp building up under the floor where it can reach out to the walls.

Re-Pointing Black Slate Flagstones in the Lake District

The first step of the renovation was to knock out the remaining pointing with an 8lb Titan hammer drill fitted with a chisel attachment. The debris was cleared and new pointing applied. For this I like to use a product called VDW800, we don’t sell it at Tile Doctor but its easily sourced on-line. and for my money it’s the best pointing product on the market. It can be used inside or outside, it’s totally waterproof but it’s also breathable, flexible and comes in four different colours.

Black Slate Floor During Renovation Ullswater

Unlike Lime pointing this product fully hardens after twenty four to forty eight hours (depending on temperature) and it doesn’t wash out. Once the pointing was completed, we left it to dry overnight.

Next, we gave the floor a general clean with Tile Doctor Remove and Go which was sprayed onto the stone floor and then after about ten minutes worked in with a Black scrubbing pad fitted to a rotary floor machine. This is good for softening up paint and old sealers so they can be rinsed off with water and extracted with a wet vacuum.

Black Slate Floor During Renovation Ullswater

Deep Cleaning Black Slate Flagstones

The next day our attention turned to the Slate flagstones which had been stained by all types of material that had accumulated over the years; this included paint, old sealer, and bits of Varnish to name a few, you name it this floor had it.

To renovate stone when it’s this bad they only option is to use a technique we call Milling that uses very abrasive “Milling Pads” encrusted with industrial diamonds to grind off the surface to reveal new stone underneath. It also makes the stone much more smoother to walk on and as a result easier to clean going forwards. A further benefit is a smoother stone requires less sealer. The milled floor combined with the new pointing should result is an almost new floor.

The great thing about offering this service is that the customer retains the look and feel of the original floor which in this case ran from the front room, passage, and Kitchen area.

The milling pads are applied using a floor buffer which is weighted to ensure a strong contact with the stone. It does generate a lot of dust though so we use water to contain the dust and help with lubrication. Once done the floor is rinsed with more water and the resultant slurry extracted with a wet vacuum.

The next step is to apply a sealer however the Slate needed to be completely dry before we could do that so it was left to dry out for a few days.

Black Slate Floor Renovation Ullswater

Sealing a Slate Tiled Kitchen Floor

Once the Stone had dried sufficiently (they never dry fully in old buildings without a DPM) the weather had changed for the worse and we had a full blizzard has arrived with snow and ice etc. It wasn’t ideal for sealing but the sealer we had chosen to use on this occasion copes well with damp due to it having an oil base and is rated for external use.

Black Slate Floor Renovation Ullswater

The sealer used is called Tile Doctor X-Tra Seal and is excellent on Black Stone as all Black Stones get their colour from the oil content inside the stone. The sealer fills up the pores in the stone resulting in a lovely dark sheen. The only disadvantage is its quite an expensive product however only one coat was needed and, on this occasion, it was the only sealer I would have recommended for this floor.

Black Slate Floor Renovation Ullswater

Once complete the floor looked completely transformed and should look great from many years to come. Assuming they and future owners of the property look after the floor it should never need Milling again just a deep clean and fresh seal ever five to seven years.

Black Slate Floor After Renovation Ullswater Black Slate Floor After Renovation Ullswater

On the subject of maintenance, we took time to discuss after care cleaning before leaving and informed them to stay clear of using a steamer as this will damage the sealer. To clean this floor I recommended they use Tile Doctor Neutral Clean which is a mild but effective specialist tile cleaner that’s Ph neutral and comes in a concentrate so a little goes a long way. Naturally there are many tile cleaning products available in the market but you do need to careful as many are bleach bases and can harm the sealer, even washing up liquid which is a very good degreaser will damage a stone sealer.

Black Slate Floor After Renovation Ullswater


Professional Restoration of a Slate Tiled Kitchen Floor in Cumbria

Black Slate Floor Renovated in Glenridding Ullswater Read More »

Victorian Hallway Floor Renovated in Carlisle

Original Victorian Hallway Floor Restored Back to Life in Carlisle

This is probably one of the oldest Victorian floors we have worked on, the house dates back to 1853 and is the second one we have covered on the same road in the leafy city of Carlisle . The whole street was owned by the council for several decades and the houses including floors have experienced all sorts of damage to them over the years. More recently the houses have been released to a private developer who called us in to handle the restoration and resurrect the hallway tiles which you will see on the pictures.

Period 1853 Victorian Hallway Floor Before Restoration Carlisle Period 1853 Victorian Hallway Floor Before Restoration Carlisle

Cleaning and Repairing a Victorian Tiled Hallway Floor

The first job for us was the tile repair, and this meant preparing the surface for the new tiles, which involved carefully knocking up all the loose and cracked tiles and then re setting them using matching replacements where necessary.

Period 1853 Victorian Hallway Floor During Restoration Carlisle

To do this I like to use a multi tool to score the grout and then break out the cracked tiles with a hammer and chisel or a power drill. The replacement tiles had to be re-sized to fit, oddly enough most of the damage was along the edge of the floor where air ducts used to be in place and then these had been concreted in. The main part of the floor though was still in good order even though it was 170 years old.

Period 1853 Victorian Hallway Floor During Restoration Carlisle Period 1853 Victorian Hallway Floor During Restoration Carlisle

Once the replacement tiles were set, a low moisture cleaning technique was used to get the whole floor clean. This involves covering the tiles in Tile Doctor Oxy-Gel and leaving it to soak into the tile for ten minutes. Being a gel cleaner, it is easier to control and there is less water involved. The gel is then scrubbed in with a buffing machine fitted with a 100-grit milling pad. A little bit of water is added to help lubricate and scrub off the dirt and soiling. A wet vacuum is then used to remove the soil which is an essential piece of kit for this line of work.

After the initial clean the floor was given an acid rinse using Tile Doctor Acid Gel which was applied neat and as before scrubbed in using a pad, this time using a finer 200-grit milling pad. Again, a little water was used to aid in the clean up being careful not to flood the floor.

The reason for the low moisture clean is that there was a basement underneath the hallway and the client had nowhere else to put certain fabrics, furniture etc so with a low moisture clean we can minimise the chance of any water finding its way into the space below. The wet vacuum was deployed again to remove the cleaning products and water and the floor was left to dry.

Sealing a Victorian Tiled Hallway Floor

Once clean and dry the floor was sealed using two coats of Tile Doctor X-Tra seal which as the name suggests is a little bit extra as it’s a very robust sealer, although mainly designed for outside areas it’s an oil-based formula that works really on Victorian tiles.

Period 1853 Victorian Hallway Floor After Renovation Carlisle Period 1853 Victorian Hallway Floor After Renovation Carlisle

One done the floor looked great, and the developer was very happy with the result.

Period 1853 Victorian Hallway Floor During Restoration Carlisle


Professional Restoration of a Victorian Tiled Hallway in North Cumbria

Original Victorian Hallway Floor Restored Back to Life in Carlisle Read More »

Semi Riven Green Slate Renovation Keswick

Semi Riven Green Slate Floor in Keswick

The owner of this property in Keswick requested a visit to take a look at their Green Slate kitchen floor. The Slate tile was the Semi Riven variety which works well in a Kitchen due to the rough surface being anti-slip however that rough surface can also trap dirt.

Some areas needed a deep clean and other areas were still in good order but because the client was not sure of which sealer, they had used in the past it would be necessary to treat all three floors with the same process and strip off the original sealer first. All were interconnected and if we only covered one room and not the next there would be a difference in the finish between the floor areas.

Semi Riven Green Slate Before Cleaning Keswick

Although the Green Slate floor was the main issue, I noticed that they had a small Quarry tiled hallway at the front of the property which looked tired, so I offered to renovate that as well. The process for cleaning and sealing Quarry tiles is virtually the same as Slate so it made sense.

Quarry Tiled Hall Floor Before Cleaning Keswick

Cleaning a Semi Riven Green Slate Tiled Kitchen Diner Floor

Before we do any work at all you will notice on one of the pictures that we apply a thin coat of clear silicone to the bottom of the units where it meets the slate, this stops water getting underneath and causing a capillary action forming and blowing the wood, or in this case MDF which is very absorbent more so than standard wood and will blow within 10 to 15 minutes of water being left to stand underneath it. Using the silicone stops this problem completely (assuming no gaps have been left for water to seep into).

Semi Riven Green Slate Before Cleaning Keswick

Working in three separate zones I started by removing the original sealer with the application of a medium dilution of Tile Doctor Remove and Go. This product is a sealer and coatings remover. My method was to let the solution soak into the tiles for about ten minutes and then work it in using a coarse 200-grit milling pad fitted to a rotary buffer. These pads really get into the rough surface of the slate stripping off the old sealer and getting the tile clean at the same time. The slurry generated was rinsed away with water and then extracted with a wet vacuum.

Next the Slate was treated to an acid rinse using Tile Doctor Grout Clean-Up. This process removes mineral deposits including old grout smears and really shows the tile at its best. The acidic nature of the product will also serve to neutralise the alkalinity in the tile caused by the application of Remove and Go earlier. Additionally Remove and Go is designed to strip off sealers, so I didn’t want any trace of it hanging around in the pores of the stone.

After a thorough rinse and extraction, the floor was left to dry off overnight.

Sealing a Semi Riven Green Slate Tiled Kitchen Diner Floor

I came back the next day to apply a fresh sealer to the floor checking first it was dry by taking a few moisture readings with a damp meter. Slate and Quarry tiles are porous, as it’s the top layer of Grout and without a sealer in place dirt can become lodged in the pores making it very difficult to lean.

The moisture readings confirmed the floor was dry enough to be sealed however my client was still unsure of the finish they wanted so before starting different sealers were applied on different parts of the floor so they could get an idea of how it would look.

Semi Riven Green Slate After Cleaning Keswick Semi Riven Green Slate After Cleaning Keswick

After reviewing the results Tile Doctor Colour Grow was chosen, it’s a matt effect sealer which lifts the overall finish of the stone by enhancing its natural colours, it also worked well on the Quarry tiles and will provide many years of protection.

Quarry Tiled Hall Floor After Cleaning Keswick

The client was very happy with the finished floor and especially how improved the grout looked which was an additional bonus. Before leaving I took time to explain how to maintain the floors going forward for which I always recommend a mild tile cleaner such as Tile Doctor Neutral Tile Cleaner. Many of the products you find in supermarkets are simply too strong for cleaning a sealed floor and will strip the sealer off prematurely.


Professional Restoration of a Semi Riven Green Slate Tiled Kitchen diner in North Cumbria

Semi Riven Green Slate Floor in Keswick Read More »

Textured Ceramic Kitchen Floor Tile Grout Colouring Keswick

Textured Ceramic Tile and Grout Clean and Colouring in a Keswick Kitchen

The owner of this property in Keswick had twenty-year-old Textured Ceramic Tiles installed in the Kitchen which have the advantage of increasing grip. However, the textured nature of the tile has the disadvantage of trapping dirt, making them difficult to keep clean.

Ceramic Tiled Kitchen Floor Before Grout Colouring Keswick

More importantly the Grout which was originally white had also trapped turned causing it to darken over the years and it had now turned black as you can see in the photos. Although waterproof the top layer of grout is cementitious and slightly porous and so it does attract dirt over time.

Ceramic Tiled Kitchen Floor Before Grout Colouring Keswick

The floor now needed a thorough clean to remove the trapped dirt from the textured tile and the grout. Whilst we can deep clean the grout using products like Tile Doctor Pro-Clean it won’t prevent the problem from happening again. We therefore recommended applying a grout colourant to the floor which adds a protective epoxy barrier over the grout in the colour of the client’s choice. This makes the grout look new and fresh and of course protects the grout going forward, its also much easier to keep clean.

Deep Cleaning Textured Ceramic Tile and Grout

To start we used Tile Doctor Grout Colourant Pre-Treat Cleaner which was scrubbed into the floor with a particular focus on the grout. This cleaned up the ceramic tiles and grout and being slightly acidic etches the surface of the grout to improve the bond with the colourant. I always recommend doing this as it does achieve a superior bond with the colourant helping it to last.

After the grout was pre-treated, cleaned, and dried using air blowers and a heat gun I started the lengthy process of applying the grout colourant. The kitchen was a good size and there were lots of grout lines that needed colouring, so it did take some time.

Ceramic Tiled Kitchen Floor During Grout Colouring Keswick

The colourant comes in ten different popular colours and on this occasion, I advised the client that Sandstone Grout colourant would work best. To prove my point, I demonstrated how it would look on a few of the grout lines so they could get a better idea of how it would look.

They agreed with my choice and I spent the rest of the day meticulously applying two coats of Sandstone Grout Colorant, which is tedious work but very rewarding. You can see the progress we made during the day on the pictures below, the only issue encountered was a free flying Quaker parrot which had a habit of dive bombing every time someone stood up!

Ceramic Tiled Kitchen Floor Grout Colouring Quaker Parrot Keswick

We finished the clean and left the client with a bottle of Tile Doctor Neutral Cleaner for future cleaning of the floor. It’s very important not to use bleaching agents on the grout colourant or it will fade, you will find bleaching agents in all types of household products.

Ceramic Tiled Kitchen Floor After Grout Colouring Keswick

My client was very happy with the completed work and left the following feedback:

“Russell and his mate (sorry I didn’t catch his name) arrived on time and made an excellent job of rejuvenating our kitchen floor in the day even though this required a late finish for them. They were no trouble to have in the house.”

It is always nice to get positive feedback from a customer, feedback is like icing on the cake.

Ceramic Tiled Kitchen Floor After Grout Colouring Keswick


Professional Restoration of a Ceramic Tiled Kitchen Floor in North Cumbria

Textured Ceramic Tile and Grout Clean and Colouring in a Keswick Kitchen Read More »

Mixed Slate Tiled Kitchen Floor Renovation Clifton

Deep Cleaning a Mixed Chinese Slate Floor in Clifton near Penrith

The pictures below are of Chinese Slate floor in the Kitchen of a property in the small village of Clifton just south of Penrith. We often get asked what the difference is between Rough and Semi Riven Slate, and this floor was a mixture of both.

If you look closely at the pictures and check out the darker parts of the floor you will see these smoother Semi Riven Slate, whereas the light copper-coloured parts of the floor were of the rougher textured variety. It’s not that unusual for stone to be mixed in this fashion as it can be supplied from different quarries in order to achieve a particular look.

Rough Chinese Slate Floor Before Cleaning Clifton Penrith

The blend of different slates makes little difference when it comes to cleaning as the process is essentially the same. I would advise though if you intend to clean the floor using a mop then you should opt for Semi Riven Slate as Rough Slate can shred your mops and make it harder to maintain. We tend to use industrial floor buffing machines which work well on both surfaces so are less effected.

Rough Chinese Slate Floor Before Cleaning Clifton Penrith

Cleaning a Rough Chinese Slate Kitchen Floor

There was a bit of wax on this floor so to remove this Tile Doctor Wax Away was applied. The product was left to stand for fifteen minutes before being scrubbed into the stone, rinsed and then the soil extracted with a wet vacuum.

We then finished the cleaning with an Acid Rinse which involves scrubbing the Slate with Tile Doctor Grout Clean-up. This not only works well at cleaning up the stone and grout but also neutralises the alkaline pH left over from using Wax Away. I am very wary of the pH level of the floor as it could have an impact on the new sealer, giving the floor an acid rinse before sealing also ensures a better bond with the sealer.

Naturally, you can’t leave a strong product like Grout Clean-up on the Stone for long as it could etch the surface so once done the floor was thoroughly rinsed with water and extracted again with a wet vacuum. A mop and bucket and lots of sponges won’t do the job on a large area like this.

Sealing a Rough Chinese Slate Tiled Kitchen Floor

Once we finished the clean, we left it to dry off overnight and came back the next day to apply the sealer. We were originally going to apply a satin finish sealer, but the client had a big dog with sharp claws which could of scratched and marked the sealer so decided against it. I advised the client to use an Impregnating sealer called Tile Doctor Colour Grow, which lifts the natural colours in the stone, but is not a topical shiny sealer as the seal soaks into the Slate and leaves a a nice matt finish instead. Only two coats of sealer were needed, and the floor looked like new again.

Rough Chinese Slate Floor After Cleaning Clifton Penrith

My client was very happy with the difference in the appearance of the stone and how much cleaner the grout was, so much so they the following feedback for us, which is always appreciated.

“Totally impressed with the team they couldn’t have been more professional and even left me with some cleaner. My horrible 12 year old slate tiles look fabulous”

As usual we left a free bottle of Tile Doctor Neutral Tile Cleaner for aftercare, it’s very important not to undo all that hard work by using a product which will damage the seal, using a pH neutral cleaner will keep the seal looking sharp and fresh for years to come.

Rough Chinese Slate Floor After Cleaning Clifton Penrith


Professional Restoration of a Rough Chinese Slate Tiled Kitchen in North Cumbria

Deep Cleaning a Mixed Chinese Slate Floor in Clifton near Penrith Read More »

COVID-19 Symptoms

Working Through COVID-19

Due to the impact of the Covid-19 Coronavirus it’s become necessary to change our working practices in-line with government guidelines and to take action to minimise health risks to you and our team.  At present, none of our team are showing any symptoms of the virus so we are continuing home visits for quotes and to complete scheduled works should it be safe to do so.

All Tile Doctors are aware to look out for the known symptoms of High Temperature and New Continuous Cough. We are aware of the need to self-isolate should it be necessary and should this be the case we will contact you to postpone. We also ask you monitor your own health and contact us should it be necessary for you to postpone for the same reason. Should you be in a high-risk group we recommend contacting us to re-arrange a visit to later in the year.

Naturally the situation could change very quickly and therefore we will no longer ask for any official notice should you wish to postpone or cancel a booking, however we would appreciate a phone call.

Our Tile Doctors are aware of the guidelines and will carry out a risk assessment at every premises they visit. They also understand the importance of observing the following whilst on site:

  • Avoiding Physical Contact
  • The importance of Social Distancing
  • Wearing single use Gloves and Overshoes
  • Regular hand washing and use of liquid sanitiser
  • Cleaning Equipment with Detergent after use

We are monitoring Government guidance and will ensure we continually adjust our working practices as required and endeavour to keep you informed. These are challenging times that are impossible to predict, the key is to stay safe and accepting of late changes should they occur.

Regards

Heidi Taylor
North Cumbria Tile Doctor
#TileDoctorUK #weareinthistogether #pulltogether #staystrong

For more information about Covid-19 virus we recommend the following sources:
https://www.nhs.uk/conditions/coronavirus-covid-19/
https://www.gov.uk/government/collections/coronavirus-covid-19-list-of-guidance
https://www.gov.uk/government/publications/covid-19-track-coronavirus-cases

Working Through COVID-19 Read More »

Mexican Terracotta Tiled Floor Before After Clean Seal Penrith

Cleaning of a Mexican Terracotta floor in Penrith

I have lost count of how many Terracotta tiled floors we have cleaned and sealed over the years and the one thing it has taught me is to wary of Mexican Terracotta. This type of Terracotta is extremely hard to work with, its porous and made of soft clay which has usually been badly fired. Even if you do have all the equipment, experience and the right products it can be a challenge.

Mexican Terracotta Kitchen Floor Before Cleaning Penrith

If you look at these pictures of this Mexican Terracotta floor, we recently worked on in Penrith you will see the tiles looked very dull before we cleaned them. Testing indicated there was still a sealer present however we didn’t know what type it was. Knowing what your dealing with really helps narrow down the best cleaning products to use which for Terracotta tiles tends to fall into one of three different categories.

If you have the misfortune of having had Varnish laid on top of these tiles, then the job becomes significantly harder. Because of this we have to be flexible when pricing for the work, naturally if we give a quote and we use the wrong system then not only will we be out of product but also the extra labour time to get the job right for the customer.

Mexican Terracotta Kitchen Floor Before Cleaning Penrith

Cleaning a Mexican Terracotta Tiled Kitchen Floor

On this occasion the sealer at this property in Penrith was of the more common acrylic type, so we used a combination of Tile Doctor Pro-Clean and some Tile Doctor Oxy-Gel for the stubborn areas. The products are applied to the floor and then scrubbed in using a black pad fitted to a rotary buffing machine. This releases the old sealer and dirt from the tile resulting in a slurry that is then extracted off the floor using a wet vacuum. The floor is then rinsed with water and extracted again to make sure all the soil has been removed.

Last step the cleaning is to treat the tiles to an Acid Rinse to further clean the tiles and equalise the floors pH level after the use of alkaline cleaners. We used Tile Doctor Acid Gel for this which was first scrubbed in, then rinsed with water and finally extracted as before. The floor is then rinsed down again with water to remove any trace of product and the wet vacuum used to extract as much moisture from the floor as possible so it can have a better chance of drying out overnight.

Sealing a Mexican Terracotta Tiled Kitchen Floor

We called back the next day to seal the Terracotta first checking in several areas with a damp meter that the floor was nice and dry. All was well so several coats of a Tile Doctor Seal and Go were applied to the floor for a nice mid satin finish.

Mexican Terracotta Kitchen Floor After Cleaning Penrith

The finished floor looked fantastic and was doubly improved by the grout cleaning which had responded well to the Pro-Clean. The customer was over the moon with the transformation in their floor which now looked clean and bright.

Before leaving we left the customer with a bottle of Tile Doctor Neutral cleaner for aftercare. To get the best from their Terracotta tiles it’s important that customers use the correct product for regular maintenance cleaning from the start.

Mexican Terracotta Kitchen Floor After Cleaning Penrith


Professional Clean and Seal of a Mexican Terracotta Tiled Kitchen in Cumbria

Cleaning of a Mexican Terracotta floor in Penrith Read More »

Red Sandstone Floor Before After Restoration Keswick Cumbria

Red Sandstone Floor Pavers Restored in Keswick, Cumbria

We love working with Sandstone, it’s very satisfying as we usually get called in when it looks really horrible and grubby and after some work it ends up looking stunning. The floor in this property in the famous Lake District town of Keswick had been covered with carpet for many years, so when we uncovered it as you can see from the pictures, it was clearly in needed of major attention and a great candidate for restoration.

Red Sandstone Flagstones Before Renovation Keswick

When the floors this bad there’s no point trying to get a decent clean just by using chemicals alone, so we often offer a system we have perfected at Tile Doctor called “Milling”. We discussed the project in detail with the client and agreed a price and a time to complete the work.

Red Sandstone Flagstones Fireplace Hearth Before Renovation Keswick Red Sandstone Flagstones Before Renovation Keswick

Restoring the Appearance of Red Sandstone

Milling involves the application of several coarse grades of hard diamond pads to the stone using water to lubricate the process, the water also helps make the removal of the soil easier and reduces dust. On this occasion we used coarse 50, 100 and 200-grit milling pads applied in sequence with a weighted rotary floor machine, the floor is rinsed with water between each pad and the soil extracted using a wet vacuum.

We worked our way across the floor using this process. Not only does this give the stone the deepest clean it has ever had but it also cuts back the stone a few millimetres and takes off a lot of roughness leaving the finish a lot smoother, this makes the now Milled Stone a lot easier to maintain in the future as it has a much smoother texture and finish.

Loose grout is a common problem on these older floors, so the next step was to rake out any broken and loose grout between the slabs, clean-up and repoint to match the existing. Once that had set, we gave the floor another lighter clean with Tile Doctor Pro-Clean run along the recessed grout lines with a rush to clean them up. I was then satisfied the floor was a clean and it could be, the floor now needed to dry our before we applied the sealer.

Sealing a Red Sandstone Tiled Floor

We returned the following day and checked the floor was dry using the moisture meter, we don’t recommend applying a sealer to a damp floor as the sealer will not cure properly. All was well, so we then applied several coats of Tile Doctor Colour Grow Sealer, this is a fully breathable, impregnating sealer that will protect the stone from staining whilst enhancing the natural red colour in the Sandstone.

Red Sandstone Flagstones Fireplace Hearth After Renovation Keswick Red Sandstone Flagstones After Renovation Keswick

Using a breathable sealer on old stone floors like this is highly recommend as these floors rarely have a damp proof membrane installed and so it’s important to give moisture a way of rising through the floor naturally and evaporating rather than being trapped under the floor where it can eventually build up in the walls.

As you can imagine from the after pictures the customer was happy with the overall outcome and relieved that their decision to remove the carpet had worked out.

Red Sandstone Flagstones After Renovation Keswick


Professional Restoration of a Red Sandstone Paved Floor in North Cumbria

Red Sandstone Floor Pavers Restored in Keswick, Cumbria Read More »

Marble Floor Before and After Cleaning Penrith

Restoring Heavily Soiled Marble Tiles with Burnishing in Penrith

When you have high quality tiles like Marble, Limestone and Travertine, it’s even more important than normal to use suitable cleaning products. If, for example, you apply a slightly acidic cleaner to Limestone, it can cause severe, irreparable etching that significantly damages the appearance of the stone.

In a similar way, this customer in Penrith had been using an unsuitable wax-based liquid soap to clean her “Crema Marfil” Spanish Marble kitchen tiles. It had failed to prevent a heavy buildup of dirt, and had in fact darkened the stone, leaving it looking stained, unnatural, and all-around difficult to clean.

Marble floor before cleaning Penrith
To avoid the floor becoming a complete nuisance, the customer contacted me to see what could be done to alleviate the problems.

Marble floor before cleaning Penrith Marble floor before cleaning Penrith

Burnishing a Dirty Marble Tiled Kitchen Floor

I explained to the customer that a process we use at Tile Doctor known as burnishing would be the most effective way to clean the Marble. Also suitable for Limestone and Travertine, this process involves the sequential application of specialist diamond encrusted pads of different grits to grind down any soil buildup and gradually create an aesthetic polish in the surface of the tiles.

Our system consists of four burnishing pads: Coarse, Medium, Fine and Very Fine. I started, using a little water as lubrication, by applying the Coarse pad across the floor, as its rough grit is ideal for breaking down stubborn dirt and stains – and doss so without damaging the tile in any way.

Satisfied with the initial cleaning result achieved by the Coarse pad, I proceeded to work my way through the four burnishing pad system, applying the Medium, Fine and Very Fine pads in turn to restore the polish to the tiles. Following this, I paid some specific attention to the dirty grout, cleaning it with our reliable, multi-purpose alkaline cleaner, known as Tile Doctor Pro Clean, in combination with a steaming system.

Sealing a Marble Kitchen Floor

After completing the burnishing process, I left the tiles to dry overnight. Upon my return to the property I polished the floor one final time with the Very Fine pad before deciding that it was time to give it a fresh seal.

My choice of sealer in this situation was Tile Doctor Colour Grow, an impregnating, colour intensifying sealer that I knew would really do well to emphasise the natural beige shades in the Marble. I applied two coats of the sealer, before polishing off the excess with a buffing pad and leaving the tiles to dry again for a few hours before they could be walked on again.

Marble floor after cleaning Penrith
My customer was very pleased with the outcome. Naturally, she was drill quite concerned about keeping the tiles clean in the long term, so I left her with a complimentary bottle of Tile Doctor Stone Soap, which is specifically designed for aftercare cleaning on polished Marble, Limestone and Travertine.

Marble floor after cleaning Penrith Marble floor after cleaning Penrith


Professional Marble Tiled Kitchen Floor Restoration in Cumbria

Restoring Heavily Soiled Marble Tiles with Burnishing in Penrith Read More »

Sandstone floor Before and After milling and sealing in Penrith

Milling, Cleaning and Sealing Sandstone tiles in Penrith

Here’s an interesting job that I recently completed down in Penrith, a small market town just under three miles from the Lake District National Park.

My client had a Sandstone tiled flagstone floor in her kitchen which had been continually sealed over its lifetime – but without removing the old sealer first. This is not advised, as it can lead to a severe problem where the layers of sealer become compacted on the surface. The result is a significant build-up of old sealer which is almost impossible to remove, even with some of the best and strongest products available.

Sandstone floor before milling in Penrith
This problem is particularly acute in Sandstone because, as a naturally porous stone, it has a high grab factor when it comes to polyurethane type wax sealers. As a result, it would take me a significant amount of work to reduce the problem as far as possible.

Milling Sandstone tiles

As no chemical products would prove effective in resolving the issue, I opted to use a milling technique using abrasive, coarse milling pads. The idea is that the milling pads penetrate beneath the many layers of old sealer and re-finish the stone. In order to validate the proposed solution I conducted an experiment in a test area under the dishwasher. The test proved satisfactory, and so my client was happy to extend the solution to the rest of the kitchen floor.

Sandstone floor during milling in Penrith
As you can see from the photos, the milling pads allowed me to get in deep where chemical products were simply unable to make a difference, giving the Sandstone tiles a much more refined look. As well as flattening a stone milling does strip a tile naked so it’s necessary to seal the stone after to enhance the natural colours and features as well as protect the stone going forward.

Cleaning and sealing Sandstone tiles

After spending all day milling the rest of the floor, it came time to give it a thorough clean to remove any remaining dirt and muck, especially along the grout lines. My choice of cleaner was Tile Doctor Pro-Clean, a high-alkaline cleaner which is used on most natural stone floors, including Sandstone, Granite, Limestone and Slate. The Pro-Clean was diluted with water and then scrubbed into the tile and grout.

After finishing the clean, I left for a few days as the floor needed at least 48 hours to dry completely before it could be sealed. Tiled floors must always be left to dry completely before being sealed because any excess moisture or residue can damage the performance of the sealer. When I returned, I applied three layers of Tile Doctor Colour Grow, an impregnating, colour intensifying sealer which is designed to provide durable surface protection from within, while also accentuating the natural shades and colours in the stone.

Sandstone floor after milling and sealing in Penrith
My client was very pleased with the results, and was amazed I was able to do anything to resolve the compacted sealer issue considering that the chemical products used previously were unsuccessful.

Bringing a Sandstone tiled floor back to life in Cumbria

Milling, Cleaning and Sealing Sandstone tiles in Penrith Read More »

Victorian Tile Renovation Penrith Before and After

1831 Victorian Tiled Hallway Renovation in Penrith

Details below of a Victorian Tiled floor I renovated in Penrith earlier this year. The floor had previously been hidden under laminate flooring and the mat well had been concreted over and other tiles were missing and replaced with concrete infill.

Victorian Tile Renovation Penrith Before

Restoring Victorian Floor Tiles

I carried out a damp test and started by removing the concrete infill and levelling the mat well with a self-levelling compound. Fortunately I had been able to source reproduction tiles that were a pretty good match to the originals which is amazing bearing in mind that the floor was originally laid in 1831 (pre Victorian in fact).

Before replacing the missing tiles I cleaned the existing floor with a diluted mixture of Tile Doctor Remove and Go and NanoTech UltraClean; Remove and Go is a coatings remover so as well as cleaning the floor it also removed the traces of adhesive that was used to stick down the line. I washed down the floor and found there were still some stubborn marks which I tackled with neat Remove and Go and a steam cleaner. Once I was happy with the floor I gave it another rinse and then set about fixing the replacement tiles.

Victorian Tile Renovation Penrith After

Sealing Victorian Floor Tiles

I needed the floor bone dry before sealing so I allowed it to dry out for a couple of days before returning. I sealed the tiles with Tile Doctor Seal and Go which adds a nice subtle shine however I did find the Victorian tiles to be extremely absorbent and so needed seven coats of sealant in total which took much of the day. The sealer did well to bring out the deep colours in the tile as well as brought out the colour in the tiles as well as providing the lovely satin finish. The customers were extremely satisfied with the final result

Victorian Tile Renovation Penrith After
 

Cleaning and Sealing Victorian Tiles in Cumbria

1831 Victorian Tiled Hallway Renovation in Penrith Read More »

Slate Floor in Ulveston Before and After Sealing

Cleaning and Sealing Slate Tiles in Ulveston

This property in Ulveston had previously been used as a guest house and was now being refurbished and turned back into a home. The kitchen and conservatory had a Slate tiled floor and as you can imagine had seen a fair amount of wear from the numerous fried breakfasts that had been prepared in there. The owners had decided to replace the kitchen but were keen to keep the slate floor however it was in a bad state and looked as if it had never been cleaned and sealed for some time.

I did a small test using Tile Doctor Remove and Go (which you can see in the photograph below) and it came up really well, naturally we were booked to come back and finish the rest of the floor which I had estimated would take two days.

Slate Floor in Ulveston Test Area Slate Floor in Ulveston Test Area

Cleaning Slate Floor Tiles

Two weeks later I turned up at 9am as agreed and set up my equipment, the kitchen had already been removed so with the exception on the cooker little preparation was required. I worked in small areas using a high pressure spinner tool to remove as much dirt off the tiles as possible and a wet vacuum to remove the soiled water.

Slate Floor in Ulveston Before Cleaning Slate Floor in Ulveston Before Cleaning

Stubborn areas were treated with Remove and Go and then I moved onto the next job which was to clean up the grout. For this I used a strong dilution of Tile Doctor Pro-Clean which is a alkaline tile and grout cleaner that is safe to use on natural stone. It was scrubbed in using a stiff brush and then rinsed off with clean water, again using the wet vacuum to remove the soiled solution. The floor was now clean but still damp so I tidied up my tools and left for the day.

Slate Floor in Ulveston After Cleaning Slate Floor in Ulveston After Cleaning

Sealing Slate Floor Tiles

The Next day I came back and inspected the floor to ensure it was dry and that I hadn’t missed anything. All was well so I started to seal the floor with five thin coats of Tile Doctor Seal and Go which is an ideal sealer for slate as it adds a nice subtle sheen to the tile and being water based there is no smell as it dries. The sealer was applied using a paint pad applicator and each coat took around about twenty minutes to dry.

Slate Floor in Ulveston After Sealing Slate Floor in Ulveston After Sealing

When it was complete and the floor had dried I packed up my equipment and spent some time talking to the customer to check they were happy with the results (they were very happy) and to advise them on how to maintain the floor using with a neutral tile cleaner going forward which will help extend the life of the sealer.

Slate Floor Cleaning in South Cumbria

Cleaning and Sealing Slate Tiles in Ulveston Read More »

Victorian Tiled Floor Windermere Before and After Cleaning

Victorian Tiled Hallway Cleaned and Sealed in Windermere

I recently paid a visit to Windermere in the Lake District to clean and re-seal a Victorian Tiled hallway floor. The customer wanted the shine putting back on the Victorian tile and some tile grout had become loose and needed replacing.

Victorian Tiled Floor Windermere Before Cleaning Victorian Tiled Floor Windermere Before Cleaning

Cleaning Victorian Floor Tiles

On arrival I set up my tools and covered any areas that needed protecting against water. Once that was done I started to strip the floor of any remaining sealer using Tile Doctor Remove and Go which is a coatings and sealer remover product that is safe to use on tile, stone and grout. Working in small areas the product was scrubbed into the tile and then washed it off with water using a wet vacuum to remove the soiled solution. This process was repeated until the whole floor was clean, there were a few stubborn areas and for these I mixed the Remove and Go 50/50 with Nano Tech Ultra Clean which adds tiny abrasive particles into the solution to make a more effective product. The process of scrubbing the floor made me realise that the loose grout problem was greater than first thought and some tiles need re-laying so I decided to come back and do this the next day, before leaving however I gave the floor a thorough rinse to ensure any trace of cleaning product was removed.

Grouting Victorian Tile

The next day I arrived and fixed all the loose tiles, my preference is to use the Mapei range of tile adhesives and grout, in fact the grout comes in a range of colours which is very useful if your filling in holes in travertine etc. One the adhesive had gone off I began to grout them in including those areas where the grout was missing or become loose. The last step was to wash off the grout from the tile surface and making sure it was all tidy for the next day.

Victorian Tiled Floor Windermere During Cleaning

Sealing Quarry Floor Tiles

On the third day I returned to the house and after verifying the floor was dry with a damp tester and the grout had hardened I started sealing the floor with Tile Doctor Seal and Go putting on thin coats which took about twenty minutes to dry, in total seven coats were applied which gave the floor the nice shine the customer was after.

Victorian Tiled Floor Windermere After Cleaning Victorian Tiled Floor Windermere After Cleaning

This job took me three days in total and after I had finished we discussed how to maintain the appearance and increase the longevity of the sealer by using a Neutral Cleaning product which unlike many acidic cleaners does not eat away at the sealer.

Cleaning and Sealing Victorian Tiles in Cumbria

Victorian Tiled Hallway Cleaned and Sealed in Windermere Read More »

Cockermouth Quarry Tiled Kitchen floor Before and After cleaining

Quarry Tiled Kitchen Floor in Cockermouth

The customer called me in to resolve a problem in at a beautiful holiday cottage in Cockermouth which had an old Quarry tiled floor installed which she had tried to make shine but had ended up turning it pink in places

Cockermouth Quarry Tiled Kitchen floor before cleaining 1 Cockermouth Quarry Tiled Kitchen floor before cleaining 2

Cleaning Quarry Floor Tiles

On my arrival I spent time protecting the kitchen units and adjacent wooden floor and then started on removing the old sealer with Tile doctor Remove and Go; I sprayed it on working in small areas and working it into the tile with a brush making sure to scrub it in well, the resultant soiled solution was washed off with clean water the and then removed using a wet vacuum. After finishing with the tile I moved onto the grout joints using the same process to make sure they were all clean and then the floor was given a good rinse to neutralise the floor before sealing. Again a wet vacuum was used to remove any liquids from the floor and it was then left to dry fully overnight.

Sealing Quarry Floor Tiles

The next day I returned to the cottage and after verifying the floor was dry with a damp tester it was sealed with four coats of Tile Doctor Seal and Go which provides on-going protection as well as adding a nice shine to the tile.

Cockermouth Quarry Tiled Kitchen floor after cleaining 1 Cockermouth Quarry Tiled Kitchen floor after cleaining 2

This job took me two days and whilst I was there I took the time to explain how to maintain the floor going forward and the importance of using a Neutral Cleaner to extend the life of the sealer. Certainly the customer was very happy with the results and left the following message our feedback system:

“Absolutely delighted the tiles were very marked in places but Heidi has managed to get them off and the tiles are back to their true colour which I hoped they would be. Heidi explained step by step the procedure and I am very pleased with the result Thank you very much for the time spent and I would recommend Heidi — Veronica”

Cleaning and Sealing Quarry Tiles in Cumbria

Quarry Tiled Kitchen Floor in Cockermouth Read More »

Quarry Tile Cleaning Kendal Before and After

Quarry Tile Cleaning in Kendal Utility Room

A customer from Kendal (famous for its Kendal Mintcake) called me in to look at their Quarry Tiled Utility floor, which was looking very dirty and stained. On inspection the sealer had broken down and was no longer protecting the tile resulting in dirt getting ingrained into the pores of the tile resulting in discolouration. We agreed what short of finish was required and the customer booked me in to do the work.

Quarry Tile Cleaning Kendal Before

Cleaning Quarry Floor Tiles

My first job was to protect the surrounding areas from splashes so on my arrival I covered the wooden floor in the hallway before starting to remove the old sealer with Tile Doctor Remove and Go, I sprayed it on working in small areas leaving it to dwell for a while before scrubbing it in with a stiff brush making sure I scrubbed it in well before removing the soiled solution with a wet vacuum. I scrubbed all the grout joints at this point to make sure they were all clean and then washed the floor down to remove any chemical and neutralise the floor. It was a relatively small floor so I left it to dry and returned a few house later to seal it.

Quarry Tile Sealing Kendal

Sealing Quarry Floor Tiles

On my return I used a damp tester to make sure the floor was dry, which it was, so I sealed it with two coats of Tile Doctor Colour Grow which is a as well as protecting the floor brings the natural colours out in the tile. Naturally if the damp tester had showed that it was damp I would not have sealed the floor that day as the sealer would not have taken properly.

Quarry Tile Cleaning Kendal After
This job took me one day as it was only a very small floor and I was able to seal it in the same day the customer were happy with the result I went through the maintenance program and explained how to clean the floor.

Restoration of Quarry Tiles in Kendal

Quarry Tile Cleaning in Kendal Utility Room Read More »

Slate Tile Floor Cleaning Before and After

Cleaning and Sealing Slate Tiles in Windermere

The customer from Windermere called me in to take a look at their Slate tiled kitchen floor which was looking very dirty with ingrained stains and marks on the stone from spills etc. that were proving difficult for the customer to clean. The brief was to give the floor a deep clean, remove the stains and make it easier for them to maintain thereafter. On inspection I could see the sealer had broken down, which is why the slate was getting stained and hard to clean. I did a test area on the slate and grout to show them how it could look and it came up really well so the signed my Work survey form and booked me in to do the work.

Slate Tile Floor Cleaning Before Slate Tile Floor Cleaning Before

Cleaning Slate Floor Tiles

On my arrival I covered the wood and carpet in the kitchen and hallway to protect it then started on removing what was left of the old sealer with Tile Doctor Remove and Go; I sprayed it on working in small areas and activated it with a brush making sure I scrubbed well around the areas of slate that are risen as in this slate its uneven and then washed it off using a wet vacuum to remove the soiled solution. It was very satisfying to watch the tiles come back to life with bright colours, I kept at it all day until all the Slate tiles were clean and the sealer was fully removed, I then scrubbed all the grout joints to make sure they were all clean then I washed all the floor down before I left ready for sealing the next day.

Sealing Slate Floor Tiles

The next day I sealed the floor with Tile Doctor Seal and Go to protect and enhance the tile putting on five coats before it was fully sealed. I used an industrial air blower to help it dry quicker as the house owner had a dog and I did not want any paw prints in my work. Below is a photograph of the end results in which you can see the natural colours have come back to life.

Slate Tile Floor Cleaning After
This job took me two days and the owner was extremely happy with the result, I also spent time to explain a maintenance program discussing how to clean the floor with Tile Doctor Neutral Tile Cleaner which has a low PH and not an off the shelf supermarket cleaner which being mildly acidic can break down the sealer and reduce its life.

Restoration of Slate Floor in Windermere

Cleaning and Sealing Slate Tiles in Windermere Read More »

Textured Porcelain Tile with Charcoal Grey Grout in Kendal

Changing the Grout Colour used on Porcelain tiles in Kendal

A customer in Kendal requested that the colour of grout installed on 20m2 newly laid textured Porcelain tile floor was changed; the tiler had used a Sandstone coloured grout and they were not happy with the colour or the grouting in general which looked patchy. I recommended the use of an epoxy Grout Colouring product that re-colours, seals and rejuvenates existing grout joints and comes in twelve different colours and after showing the customer the different colour options they picked Charcoal Grey.

Textured Porcelain Tile with Limestone Grout in Kendal

Applying Grout Colourant

I did a test area so they could see how it might look under the lights which went well and so I started to apply the grout colouring to the whole kitchen floor completing small areas until the entire floor was covered and taking care not to get any on the Porcelain tile as the textured surface makes it difficult to remove and requires the use of an white abrasive scouring pad. Normally you have to use a Pre-Treater product on the grout before Grout Colouring however this grout was new and so this step was unnecessary.

Textured Porcelain Tile with Charcoal Grey Grout in Kendal Textured Porcelain Tile with Charcoal Grey Grout in Kendal

This job took me one day and only required one tube of Grout Colourant. The owner was extremely happy with the result will now have a fairly maintenance free tiled floor as Porcelain tiles are very hard wearing and the epoxy grout colourant acts as a barrier and therefore unlikely to discolour.

Changing the Grout Colour used on Porcelain tiles in Kendal Read More »

=================================

North Cumbria Tile Doctor

================================= Read More »

Scroll to Top